¶ Introduction
Dans cette documentation, nous allons apprendre à installer CalyxOS sur le Fairphone 5.
J'ai écrit un article sur mon blogue personnel de pourquoi ma démarche, n'hésitez pas de regarder mon article, ça vaut le détour ! 😉
Voici le lien :
¶ Mise en pratique
¶ Les prérequis
Afin d'installer CalyxOS sur notre Fairphone 5, nous allons devoir préparer nos "outils".
Tout d'abord il vous faut un ordinateur. Il est possible d'effectuer l'installation à l'aide un ordinateur sous GNU/Linux ou Windows. Ici, nous le ferons sous Manjaro (donc GNU/Linux).
Le tutoriel est tout à fait possible sur les autres distributions GNU/Linux, je mettrais les commandes dans le tutoriel.
Il vous faudra un câble USB C vers USB C ou USB A suivant le port disponible de votre ordinateur. Et c'est tout niveau équipement.
Voici un sommaire de tout ce qui va être fait pour pouvoir formater le téléphone :
- Activer le mode développeur sur le téléphone Android
- Activer l'accès au Bootloader
- Activer le Débogage USB
Attention, pour pouvoir accéder à ce mode, il faut suivre la procédure suivante :
https://www.fairphone.com/en/bootloader-unlocking-code-for-fairphone/
Ou simplement suivre le tutoriel ci-dessous. 
¶ Débloquage du mode développeur
Les captures d'écran ont été fait déjà sur mon téléphone sous CalyxOS. Mais sur votré téléphone Android, les étapes seront exactement les mêmes !
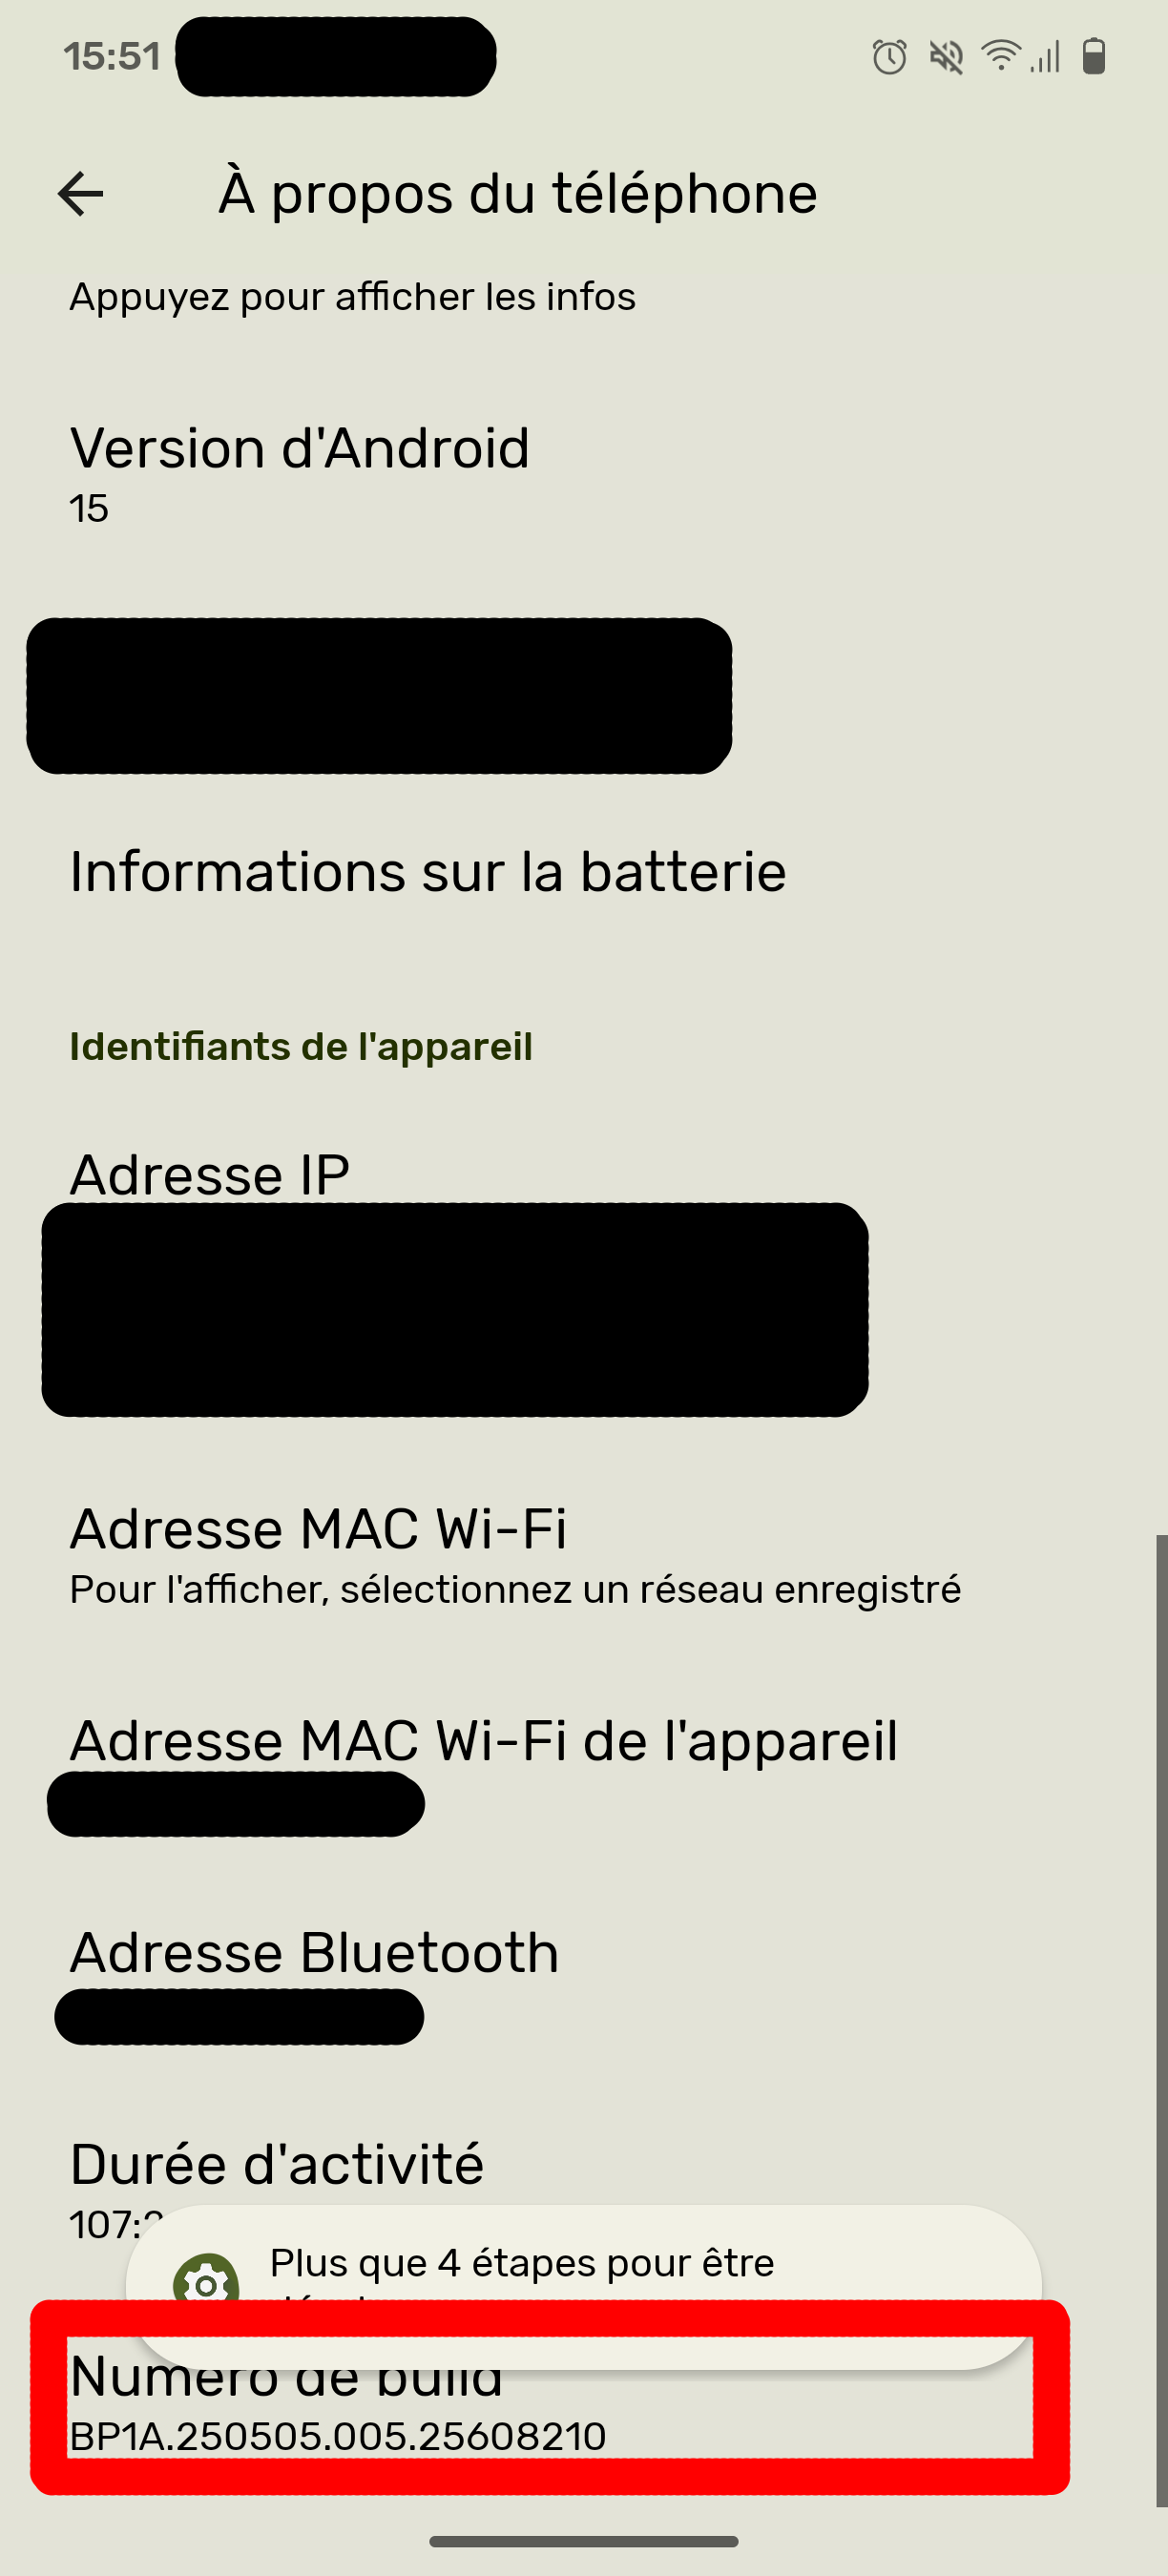
Aller dans "À propos du téléphone" ou "About Phone" :
-
Allez tout en bas, Taper 7 fois sur "Numéro de build" ou "Build Number" afin d'activer le mode développeur (en le faisant 3-4 fois de suite vous avez un petit message qui vous indique sur le monde va s'activer si vous continuer à appuyer dessus)
-
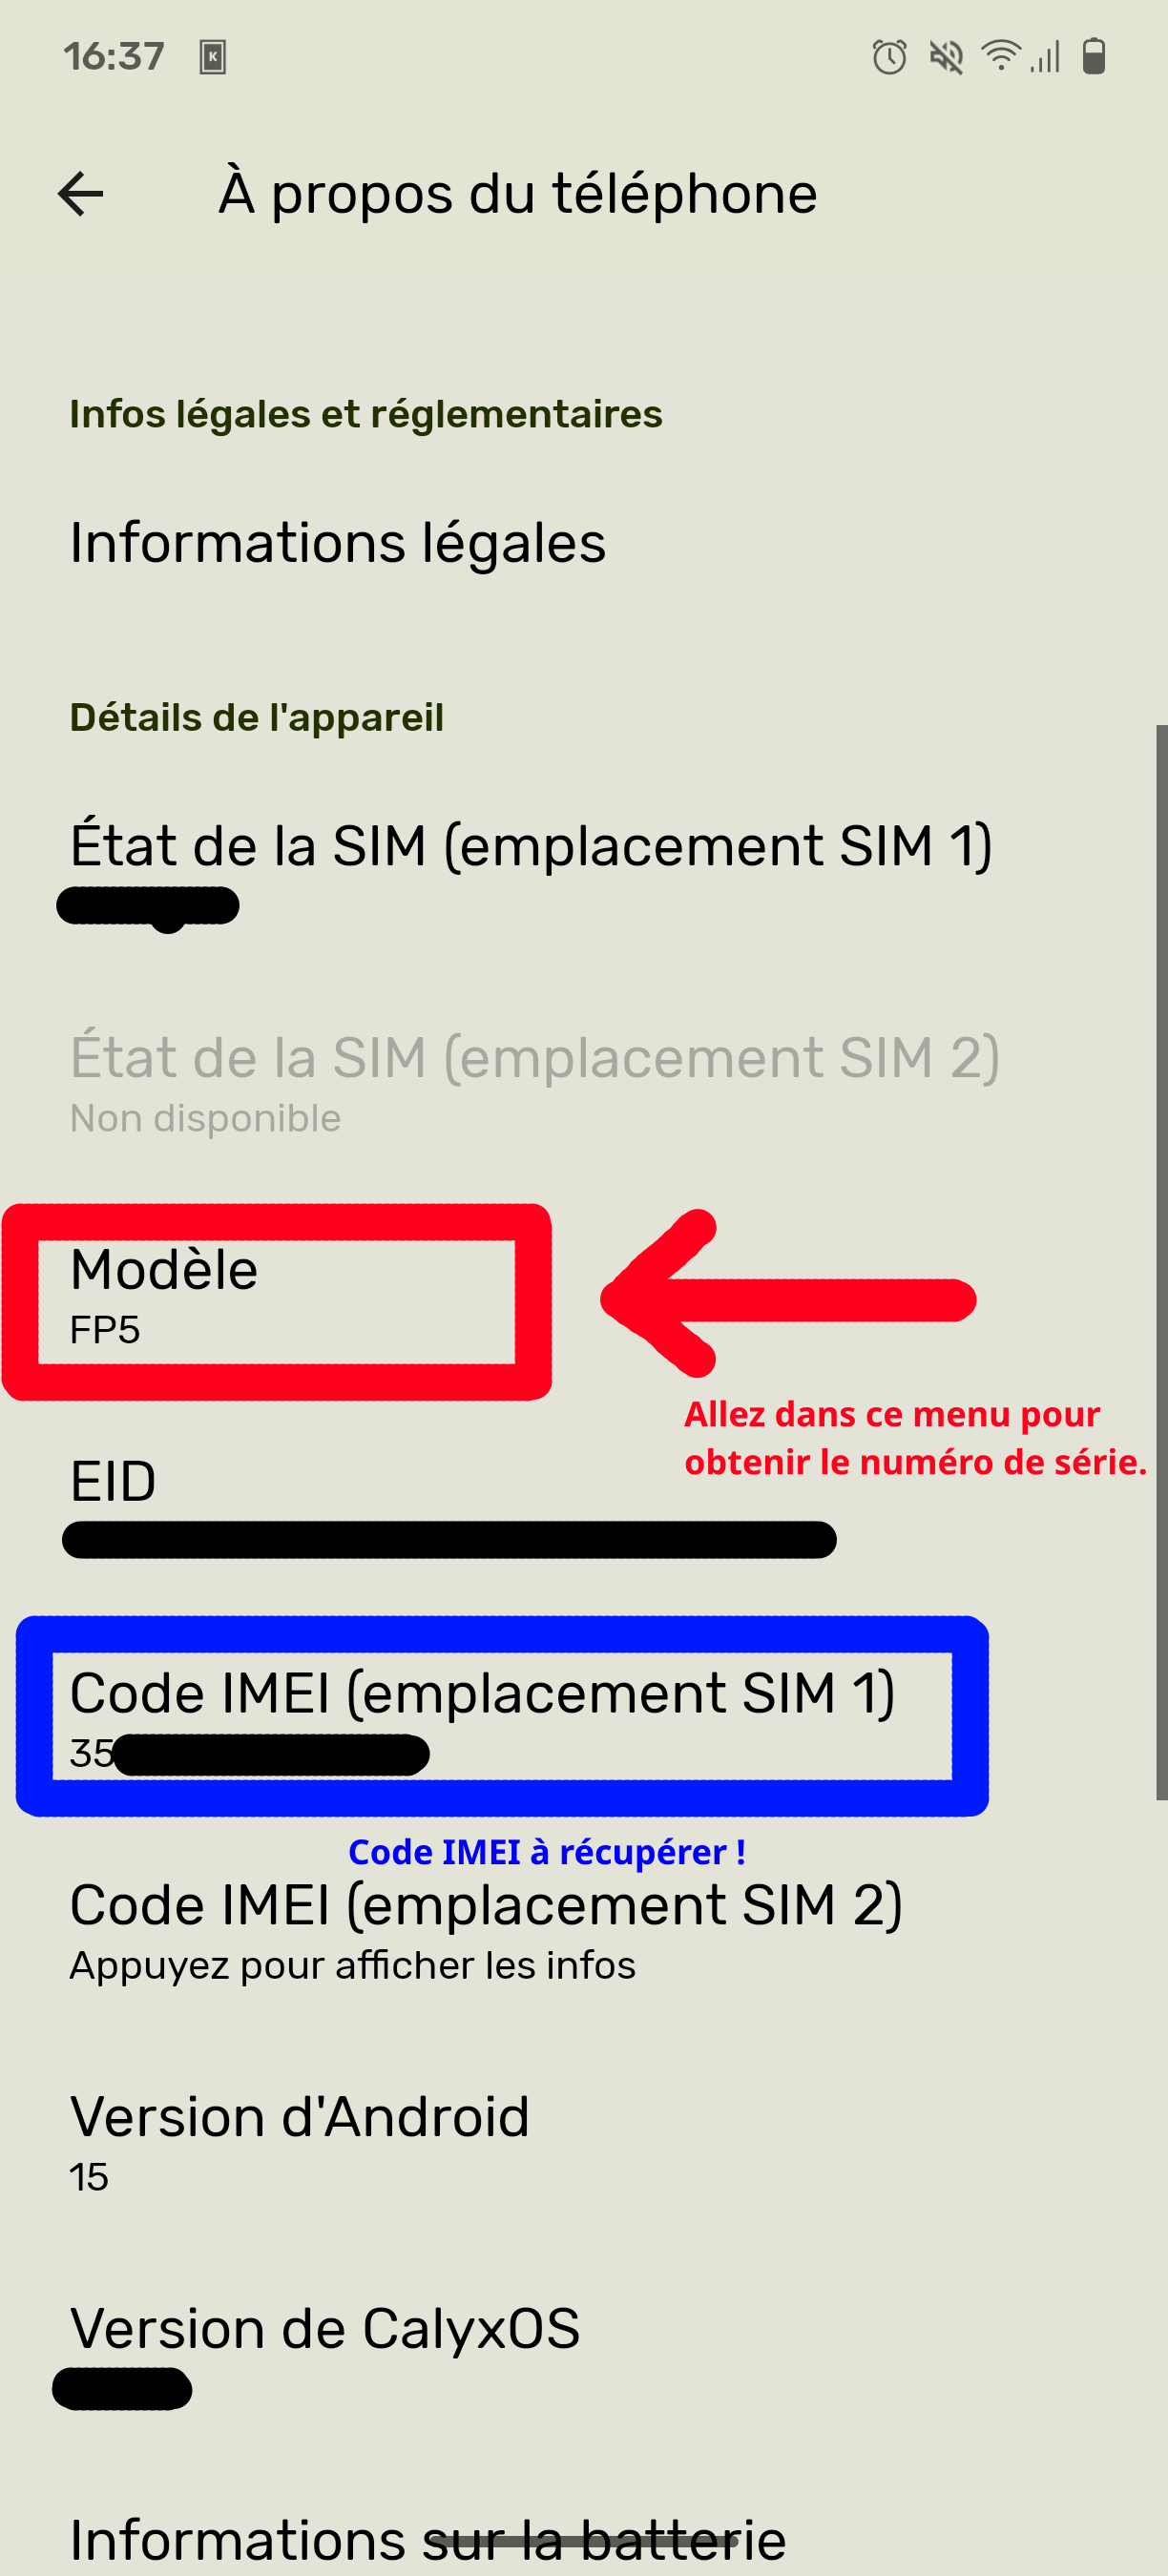
Remontez plus haut dans le même menu et affichez ensuite le "code IMEI". Notez le !
-
Et récupérez le numéro de série :

Maintenant que vous avez les deux codes, on peut se rendre sur le site de Fairphone permettant de récupérer le code permettant d'activer notre bootloader !
https://www.fairphone.com/en/bootloader-unlocking-code-for-fairphone/
Vers le milieu de la page, vous pouvez remplir les deux codes que vous avez récupérer précédemment :
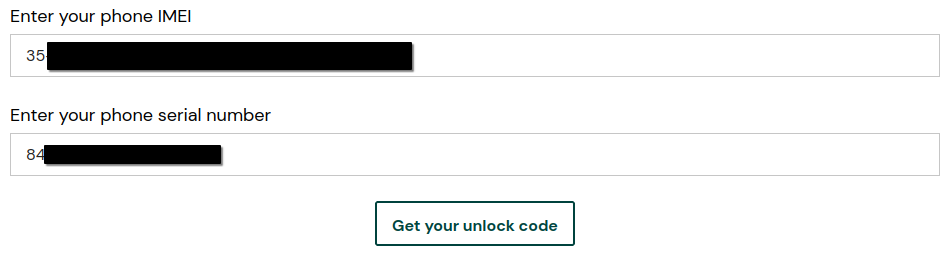
Quand les deux codes sont rentrés, vous pouvez faire "Get your unlock code" afin de récupérer le code permettant de débloquer le bootloader du Fairphone !
Vous devriez récupérer un code à 8 chiffres/caractères : 73XXXXXX
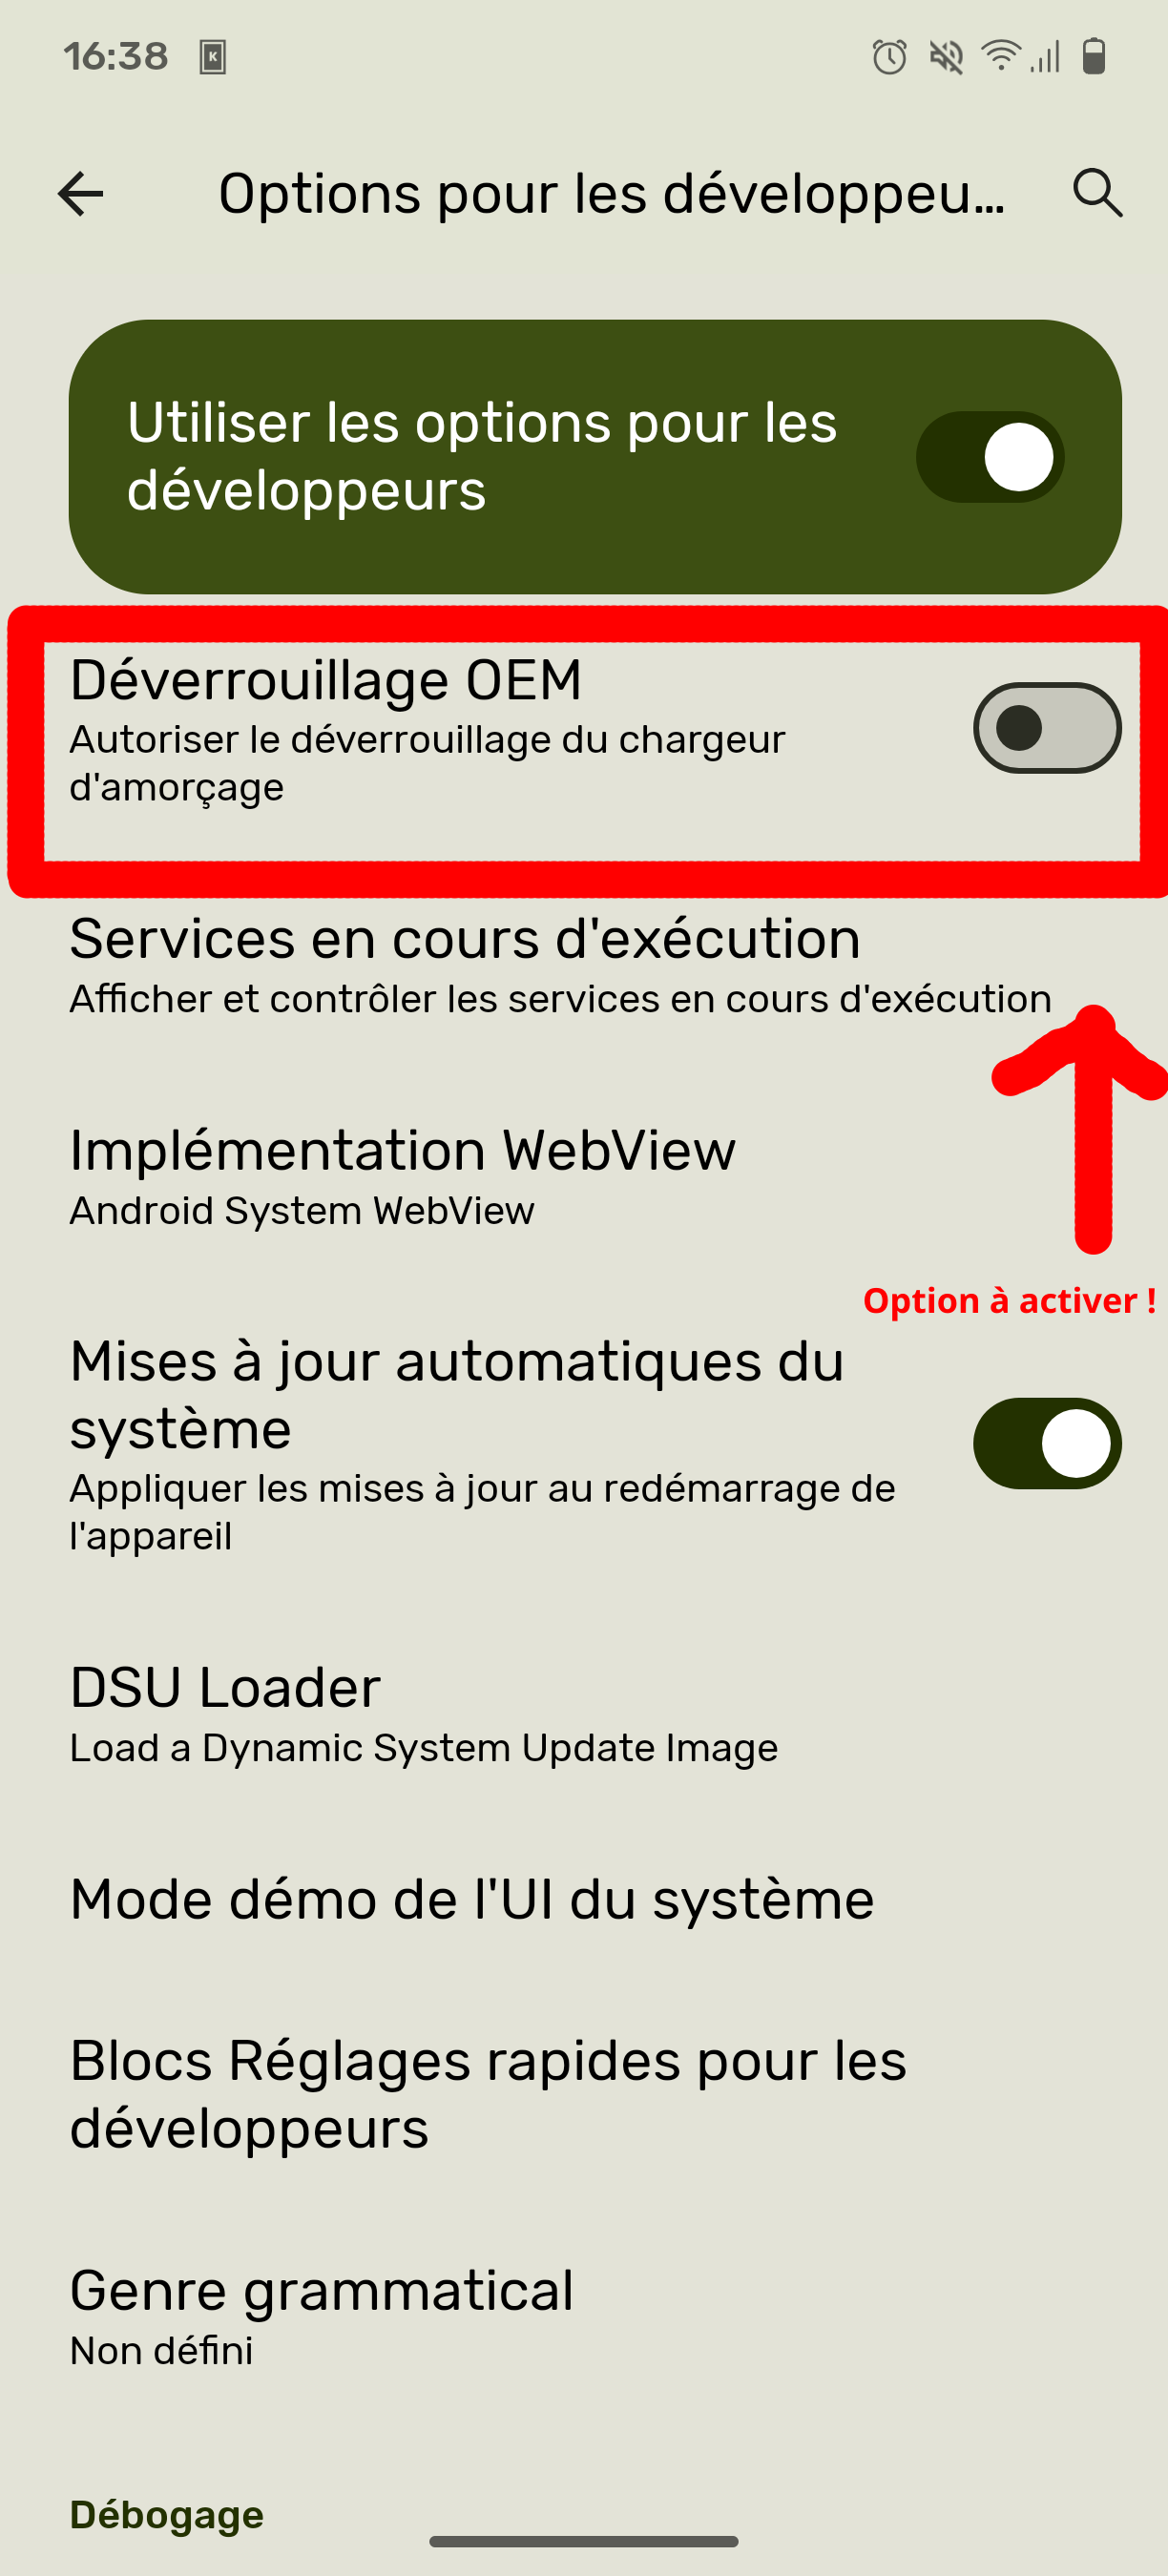
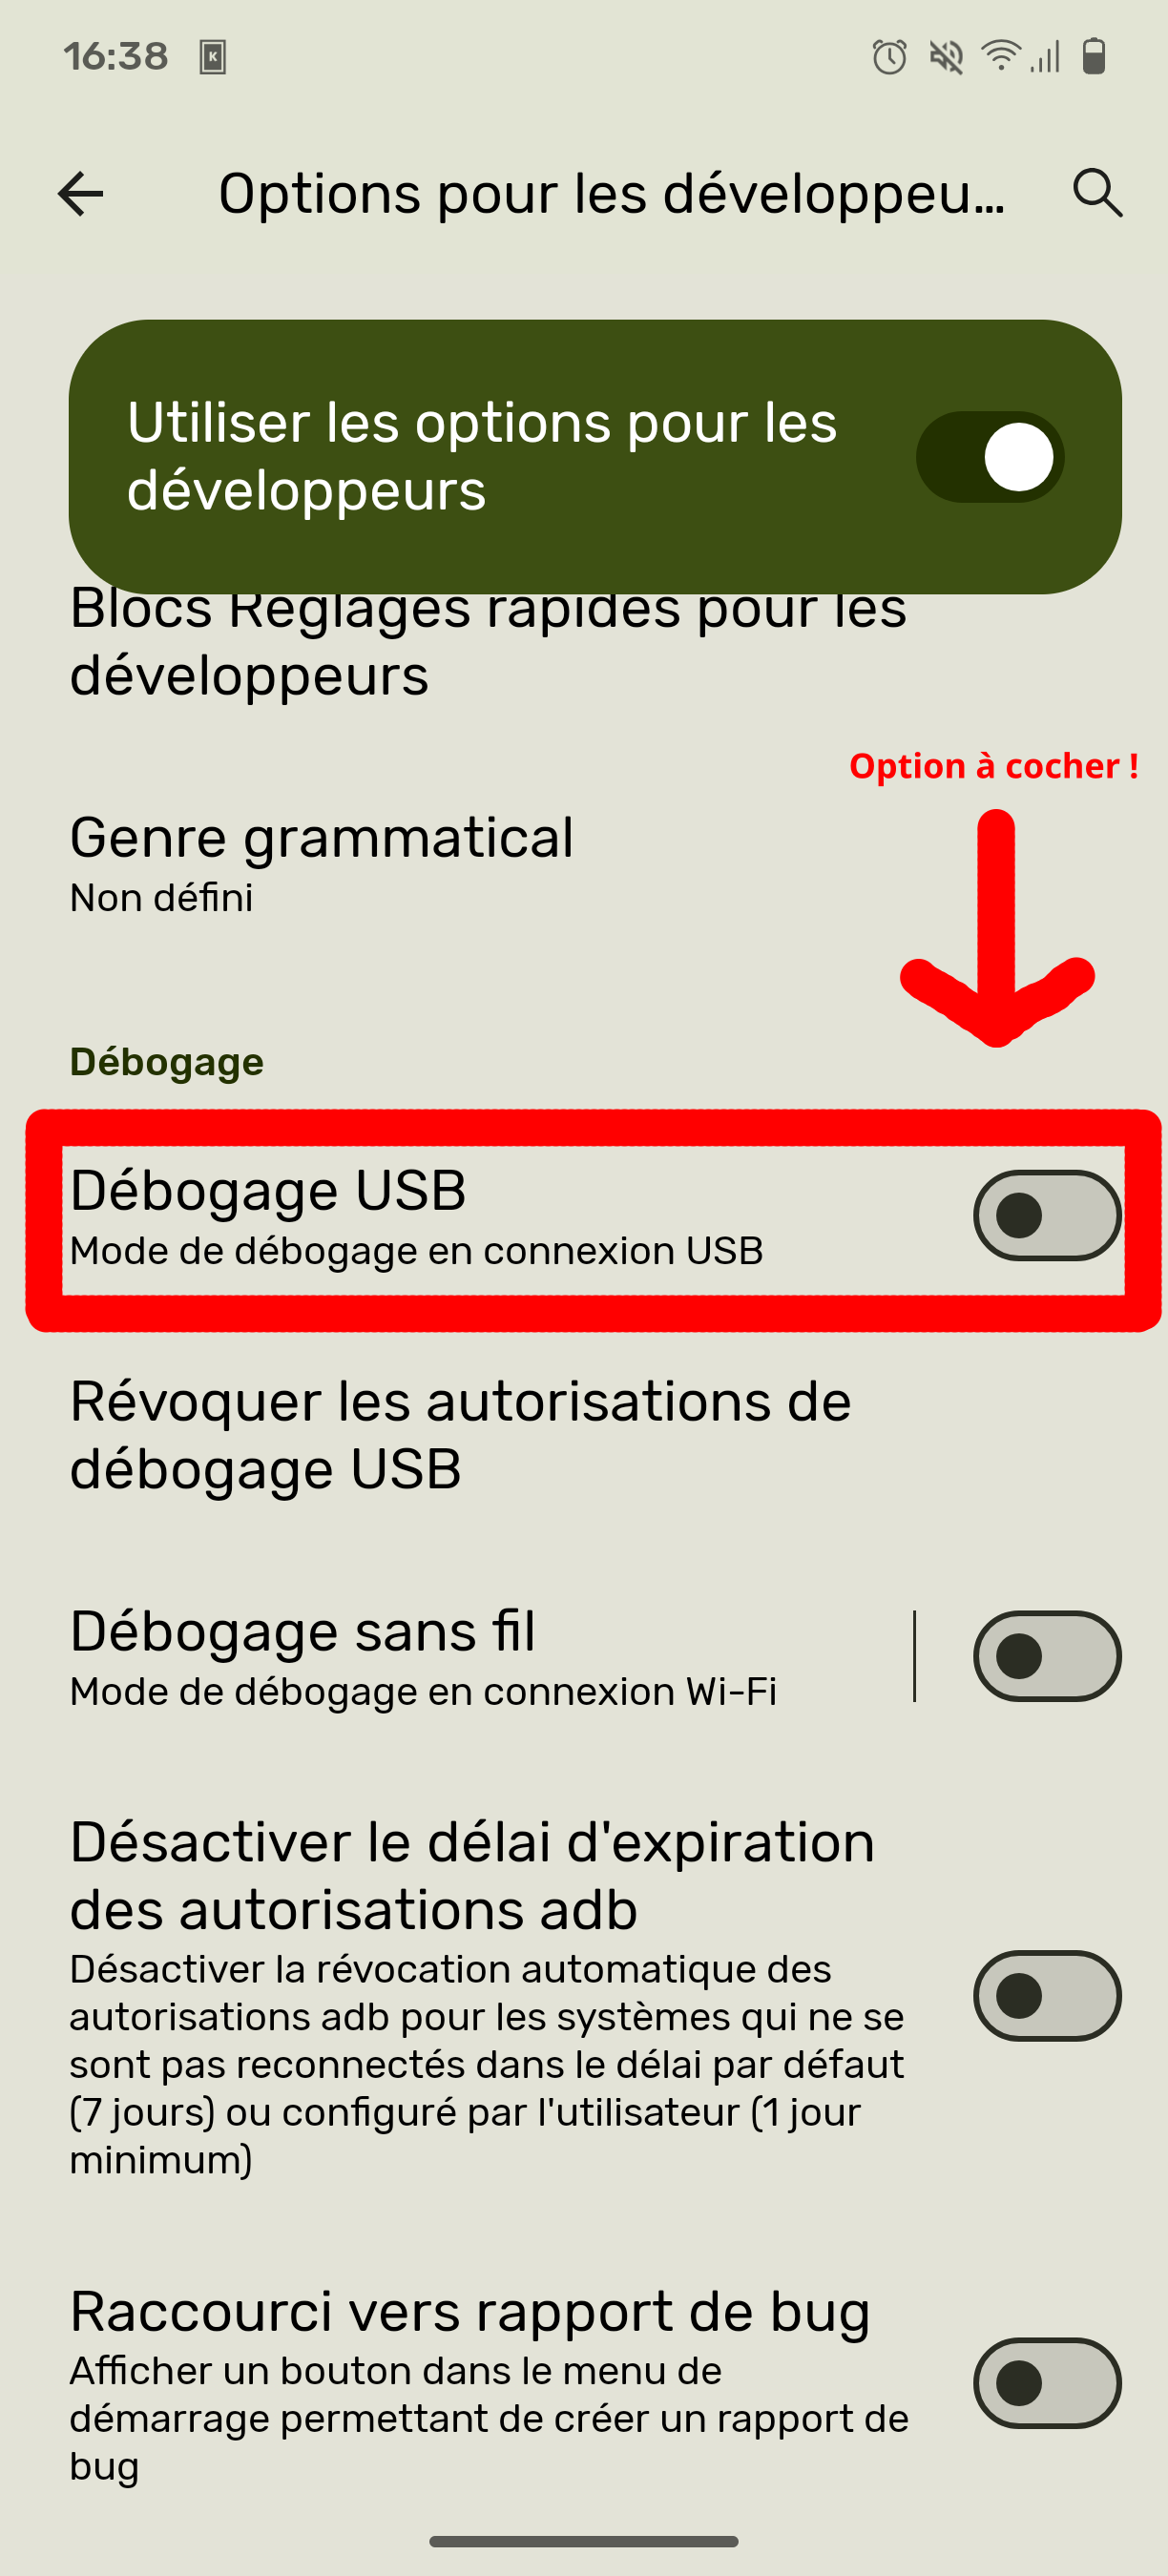
Ensuite, vous pouvez vous rendre dans système et allez dans "Option pour les développeurs". Enfin, vous allez pouvoir activer le "Déblocage OEM" ou "OEM Unlocking". Et là vous allez pouvoir indiquer le code obtenu précédemment sur le site de Fairphone.

Il suffit maintenant d'activer dans le même menu "Débogage USB" et le Dévérouillage OEM.
Et voilà ! votre téléphone est déverrouillé. Passons à la préparation.
¶ Préparation de l'opération sur Linux
Il est tout d'abord nécessaire d'installer quelques outils Android.
Voici les commandes pour :
- Les utilisateurs de Debian/Ubuntu et les distributions basées sur ces deux-ci :
sudo apt update
sudo apt install android-sdk-platform-tools-common
- Les utilisateurs de Fedora/Rocky/RHEL et les distributions basées sur ces trois-ci :
sudo dnf install android-tools
- Les utilisateurs de Arch/Manjaro/Endeav et les distributions basées sur ces trois-ci :
sudo pacman -Sy android-udev
- Les utilisateurs de d'OpenSuse :
sudo zypper install android-udev-rules
Pour les utilisateurs de NixOS, je vous laisse le soin de continuer sur cette procédure :
Ensuite, afin de s'assurer que vous ayez les dernières versions des outils et du système Calyx OS, je vous laisse le soin d'aller sur la page https://calyxos.org/install/devices/FP5/linux/ afin de télécharger le "device-flasher" et de l'image d'usine CalyxOS
Quand vous avez télécharger l'exécutable "device-flasher.linux" et l'image système de CalyxOS, Créer un répertoire afin de placer les placer dedans.
Mettez bien tous les fichiers téléchargés dans un seul et même dossier.
Enfin, rendez exécutable "device-flasher.linux" :
sudo chmod +x device-flasher.linux
Quand tout cela été fait, vous devez retirer la carte SIM de votre téléphone. Si vous ne le faite pas, vous pouvez détruire votre carte SIM. Quand cela est fait, éteignez votre téléphone.
¶ Formatage du téléphone :
Alors si vous avez bien suivi les précedentes étapes, vous devez avoir uniquement ces deux fichiers dans votre nouveau répertoire :
~/Fairphone > ls -l

total 8576
-rwxr-xr-x 1 test test 8776204 18 avril 18:04 device-flasher.linux
drwxr-xr-x 2 test test    4096 19 avril 16:27 FP5-bp1a.250405.007
Alors la partie la plus importante et intéressante commence, exécutez "device-flasher.linux" via sudo ou en tant que root (sinon cela ne fonctionnera pas) :
~/Fairphone >sudo ./device-flasher.linux                                            15s

Android Factory Image Flasher version 1.1.1
Extracting FP5-factory-25606210.zip
Verifying platform-tools_r33.0.3-linux.zip
Extracting platform-tools_r33.0.3-linux.zip
1. Connect to a Wi-Fi network and ensure that no SIM cards are installed
2. Enable Developer Options on device (Settings -> About Phone -> tap "Build number" 7 times)
3. Enable OEM Unlocking (Settings -> System -> Advanced -> Developer Options)
4. Disconnect the USB cable from your device
4.1. Power off your device
4.2. Hold volume down and connect the cable to boot it into fastboot mode.

Press ENTER to continue
Si tout fonctionne bien, vous devriez avoir tous ces nouveaux fichiers désormais dans votre répertoire après avoir exécuter le script :
~/Fairphone ls -l
-rwxr-xr-x 1 test test 8776204 18 avril 18:04 device-flasher.linux
drwxr-xr-x 2 test test 4096 19 avril 16:27 FP5-bp1a.250405.007
-rw-r--r-- 1 test test 2298194596 18 avril 18:06 FP5-factory-25606210.zip
drwxr-xr-x 3 test test 4096 19 avril 16:27 platform-tools
-rw-r--r-- 1 test test 7505569 19 avril 16:27 platform-tools_r33.0.3-linux.zip
Maintenant vous pouvez brancher le câble USB entre votre téléphone et votre ordinateur tout en allumant votre téléphone avec le bouton VOLUME BAS et POWER .
Quand cela est fait , appuyez sur ENTER de votre PC :
Detected FP5 84xxxxx <-- [NUMÉRO-DE-SÉRIE-FAIRPHONE-5]

Devices to be flashed:
FP5 84xxxxx <-- [NUMÉRO-DE-SÉRIE-FAIRPHONE-5]

Press ENTER to continue
Unlocking FP5 84xxxxx <-- [NUMÉRO-DE-SÉRIE-FAIRPHONE-5] bootloader...
5. Please use the volume and power keys on the device to unlock the bootloader

 5a. Once FP5 84xxxxx boots, disconnect its cable and power it off
 5b. Then, hold volume down and connect the cable again to boot it into fastboot mode.
 The installation will resume automatically
Vous devrier tomber sur cet écran :
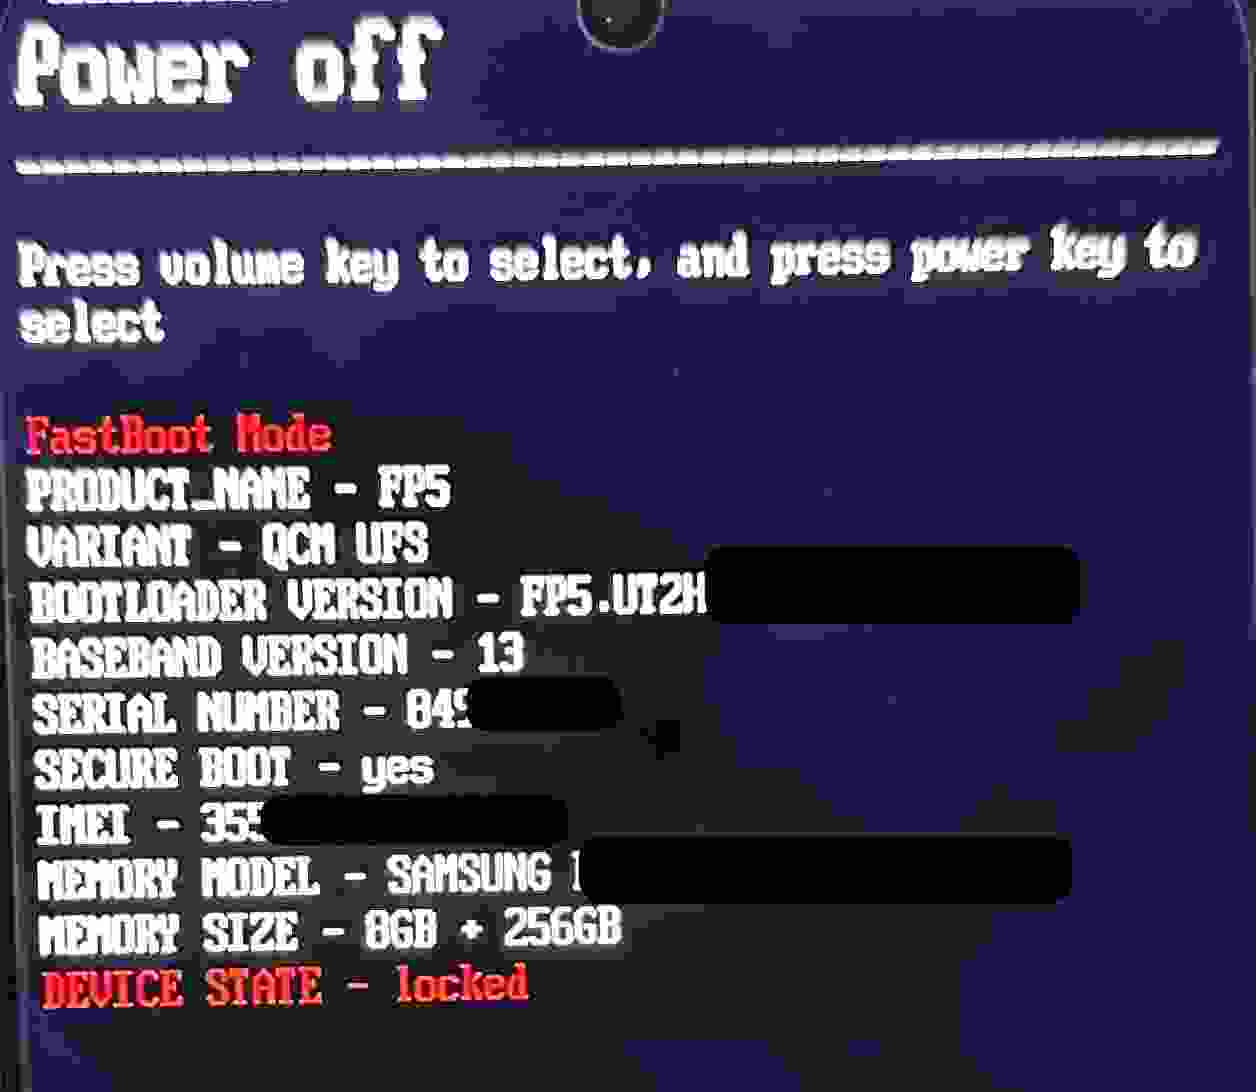
Utilisez le bouton VOLUME BAS pour atteindre l'option "DEVICE STATE - locked". Puis appuyez sur la touche POWER pour entrer dans un nouveau menu.
À cette étape, vous devez avoir cet écran ici :
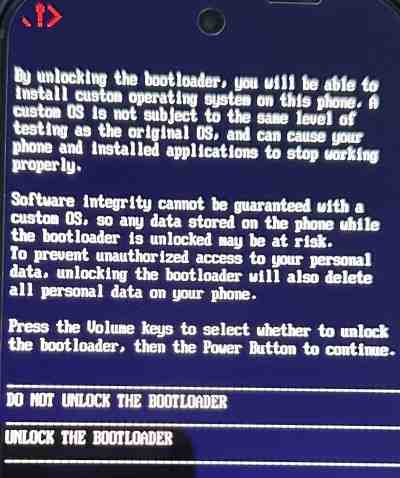
Utilisez le bouton volume bas pour descendre sur l'option "UNLOCK THE BOOTLOADER" et appuyer sur le bouton Power pour appliquer.
Puis débrancher le câble USB et éteignez votre téléphone.
Et enfin, rallumez votre téléphone avec le bouton Volume Bas et Power et connectez en même temps le cable USB.
Et l'installation reprendra automatiquement :
Flashing FP5 84xxxxx bootloader...
Sending 'abl_a' (152 KB)                           OKAY [  0.006s]
Writing 'abl_a'                                    OKAY [  0.001s]
Finished. Total time: 0.015s
Sending 'abl_b' (152 KB)                           OKAY [  0.006s]
Writing 'abl_b'                                    OKAY [  0.002s]
Finished. Total time: 0.022s
Sending 'aop_a' (203 KB)                           OKAY [  0.008s]
Writing 'aop_a'                                    OKAY [  0.002s]
Finished. Total time: 0.018s
Sending 'aop_b' (203 KB)                           OKAY [  0.007s]
Writing 'aop_b'                                    OKAY [  0.002s]
Finished. Total time: 0.017s
Sending 'bluetooth_a' (3388 KB)                    OKAY [  0.100s]
Writing 'bluetooth_a'                              OKAY [  0.012s]
Finished. Total time: 0.120s
Sending 'bluetooth_b' (3388 KB)                    OKAY [  0.094s]
Writing 'bluetooth_b'                              OKAY [  0.010s]
Finished. Total time: 0.111s
Sending 'cpucp_a' (182 KB)                         OKAY [  0.006s]
Writing 'cpucp_a'                                  OKAY [  0.002s]
Finished. Total time: 0.015s
Sending 'cpucp_b' (182 KB)                         OKAY [  0.006s]
Writing 'cpucp_b'                                  OKAY [  0.002s]
Finished. Total time: 0.016s
Sending 'devcfg_a' (52 KB)                         OKAY [  0.003s]
Writing 'devcfg_a'                                 OKAY [  0.001s]
Finished. Total time: 0.012s
Sending 'devcfg_b' (52 KB)                         OKAY [  0.003s]
Writing 'devcfg_b'                                 OKAY [  0.007s]
Finished. Total time: 0.017s
Sending 'dsp_a' (65536 KB)                         OKAY [  2.129s]
Writing 'dsp_a'                                    OKAY [  0.249s]
Finished. Total time: 2.385s
Sending 'dsp_b' (65536 KB)                         OKAY [  2.438s]
Writing 'dsp_b'                                    OKAY [  0.082s]
Finished. Total time: 2.527s
Sending 'featenabler_a' (84 KB)                    OKAY [  0.004s]
Writing 'featenabler_a'                            OKAY [  0.001s]
Finished. Total time: 0.014s
Sending 'featenabler_b' (84 KB)                    OKAY [  0.004s]
Writing 'featenabler_b'                            OKAY [  0.003s]
Finished. Total time: 0.015s
Sending 'hyp_a' (3601 KB)                          OKAY [  0.126s]
Writing 'hyp_a'                                    OKAY [  0.012s]
Finished. Total time: 0.146s
Sending 'hyp_b' (3601 KB)                          OKAY [  0.132s]
Writing 'hyp_b'                                    OKAY [  0.024s]
Finished. Total time: 0.164s
Sending 'imagefv_a' (64 KB)                        OKAY [  0.003s]
Writing 'imagefv_a'                                OKAY [  0.003s]
Finished. Total time: 0.014s
Sending 'imagefv_b' (64 KB)                        OKAY [  0.003s]
Writing 'imagefv_b'                                OKAY [  0.003s]
Finished. Total time: 0.014s
Sending 'keymaster_a' (261 KB)                     OKAY [  0.011s]
Writing 'keymaster_a'                              OKAY [  0.002s]
Finished. Total time: 0.021s
Sending 'keymaster_b' (261 KB)                     OKAY [  0.008s]
Writing 'keymaster_b'                              OKAY [  0.003s]
Finished. Total time: 0.018s
Sending 'modem_a' (184812 KB)                      OKAY [  6.749s]
Writing 'modem_a'                                  OKAY [  0.596s]
Finished. Total time: 7.352s
Sending 'modem_b' (184812 KB)                      OKAY [  6.648s]
Writing 'modem_b'                                  OKAY [  0.652s]
Finished. Total time: 7.307s
Sending 'multiimgoem_a' (13 KB)                    OKAY [  0.002s]
Writing 'multiimgoem_a'                            OKAY [  0.001s]
Finished. Total time: 0.011s
Sending 'multiimgoem_b' (13 KB)                    OKAY [  0.002s]
Writing 'multiimgoem_b'                            OKAY [  0.002s]
Finished. Total time: 0.011s
Sending 'qupfw_a' (55 KB)                          OKAY [  0.003s]
Writing 'qupfw_a'                                  OKAY [  0.003s]
Finished. Total time: 0.014s
Sending 'qupfw_b' (55 KB)                          OKAY [  0.003s]
Writing 'qupfw_b'                                  OKAY [  0.009s]
Finished. Total time: 0.020s
Sending 'shrm_a' (44 KB)                           OKAY [  0.003s]
Writing 'shrm_a'                                   OKAY [  0.008s]
Finished. Total time: 0.019s
Sending 'shrm_b' (44 KB)                           OKAY [  0.003s]
Writing 'shrm_b'                                   OKAY [  0.009s]
Finished. Total time: 0.019s
Sending 'studybk_a' (240 KB)                       OKAY [  0.008s]
Writing 'studybk_a'                                OKAY [  0.005s]
Finished. Total time: 0.021s
Sending 'studybk_b' (240 KB)                       OKAY [  0.010s]
Writing 'studybk_b'                                OKAY [  0.002s]
Finished. Total time: 0.020s
Sending 'tz_a' (3713 KB)                           OKAY [  0.130s]
Writing 'tz_a'                                     OKAY [  0.013s]
Finished. Total time: 0.150s
Sending 'tz_b' (3713 KB)                           OKAY [  0.133s]
Writing 'tz_b'                                     OKAY [  0.018s]
Finished. Total time: 0.158s
Sending 'uefisecapp_a' (122 KB)                    OKAY [  0.004s]
Writing 'uefisecapp_a'                             OKAY [  0.004s]
Finished. Total time: 0.016s
Sending 'uefisecapp_b' (122 KB)                    OKAY [  0.005s]
Writing 'uefisecapp_b'                             OKAY [  0.003s]
Finished. Total time: 0.016s
Sending 'xbl_a' (3602 KB)                          OKAY [  0.126s]
Writing 'xbl_a'                                    OKAY [  0.015s]
Finished. Total time: 0.149s
Sending 'xbl_b' (3602 KB)                          OKAY [  0.126s]
Writing 'xbl_b'                                    OKAY [  0.012s]
Finished. Total time: 0.146s
Sending 'xbl_config_a' (220 KB)                    OKAY [  0.007s]
Writing 'xbl_config_a'                             OKAY [  0.004s]
Finished. Total time: 0.019s
Sending 'xbl_config_b' (220 KB)                    OKAY [  0.008s]
Writing 'xbl_config_b'                             OKAY [  0.004s]
Finished. Total time: 0.020s
Sending 'apdp' (13 KB)                             OKAY [  0.002s]
Writing 'apdp'                                     OKAY [  0.002s]
Finished. Total time: 0.014s
Sending 'ddr' (20 KB)                              OKAY [  0.002s]
Writing 'ddr'                                      OKAY [  0.001s]
Finished. Total time: 0.010s
Sending 'logfs' (16 KB)                            OKAY [  0.002s]
Writing 'logfs'                                    OKAY [  0.001s]
Finished. Total time: 0.010s
Sending 'rtice' (261 KB)                           OKAY [  0.010s]
Writing 'rtice'                                    OKAY [  0.003s]
Finished. Total time: 0.021s
Sending 'storsec' (20 KB)                          OKAY [  0.002s]
Writing 'storsec'                                  OKAY [  0.002s]
Finished. Total time: 0.011s
Sending 'study' (240 KB)                           OKAY [  0.013s]
Writing 'study'                                    OKAY [  0.002s]
Finished. Total time: 0.023s
Sending 'frp' (512 KB)                             OKAY [  0.019s]
Writing 'frp'                                      OKAY [  0.002s]
Finished. Total time: 0.029s
Erasing 'misc'                                     OKAY [  0.002s]
Finished. Total time: 0.007s
Setting current slot to 'a'                        OKAY [  0.008s]
Rebooting into bootloader                          OKAY [  0.000s]
Finished. Total time: 0.061s
< waiting for 849b0d41 >
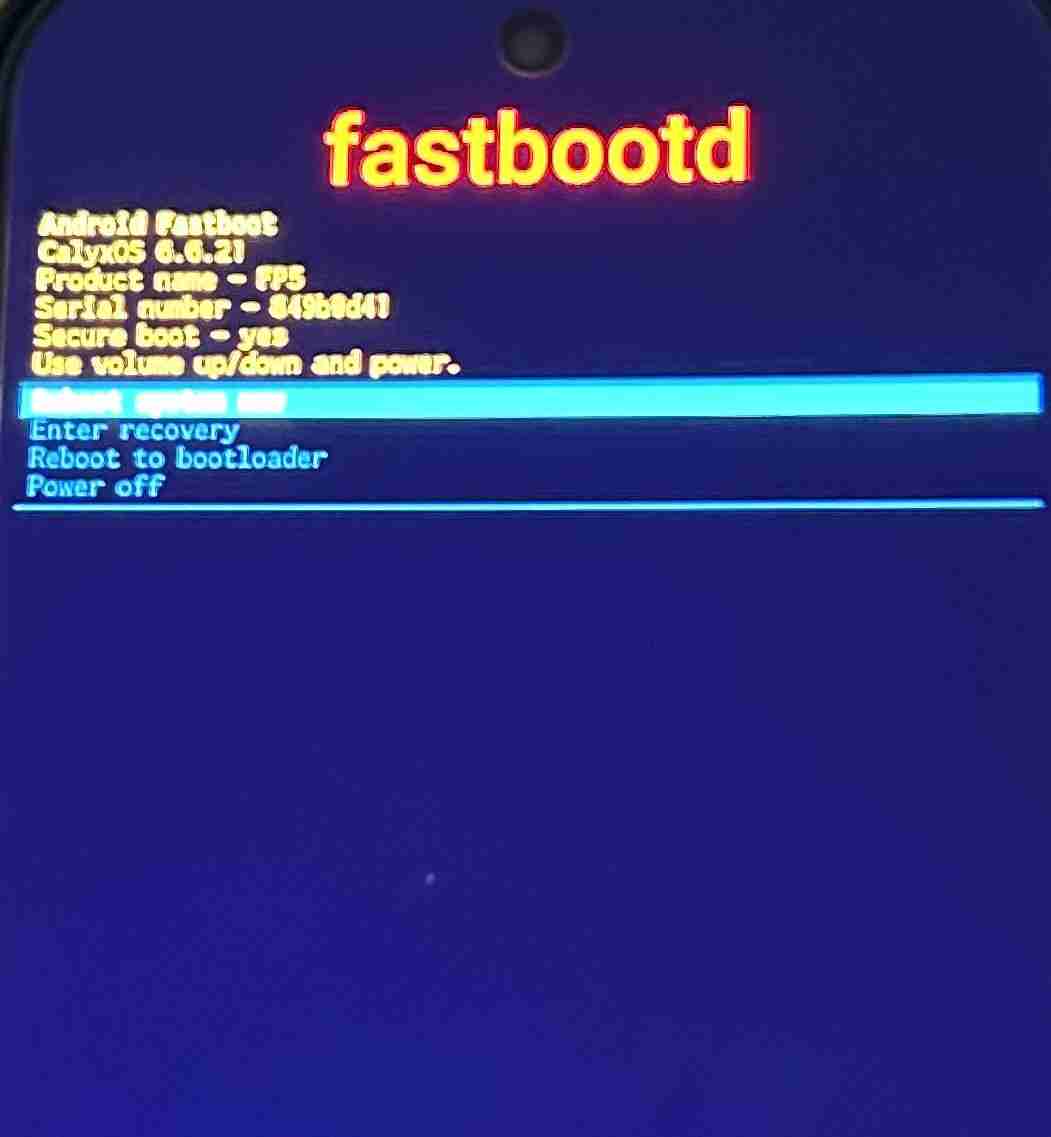
À cette étape, votre téléphone arrive cette écran, cliquez sur "Reboot system now" via le bouton POWER du téléphone :
Et l'installation reprends son cours...
Erasing 'avb_custom_key'                           OKAY [  0.008s]
Finished. Total time: 0.015s
Sending 'avb_custom_key' (1 KB)                    OKAY [  0.002s]
Writing 'avb_custom_key'                           OKAY [  0.007s]
Finished. Total time: 0.016s
--------------------------------------------
Bootloader Version...: FP5.UT2M.B.113.20250319
Baseband Version.....: 13
Serial Number........: 84xxxxx
--------------------------------------------
extracting android-info.txt (0 MB) to RAM...
Checking 'product'                                 OKAY [  0.002s]
Setting current slot to 'a'                        OKAY [  0.001s]
extracting boot.img (96 MB) to disk... took 0.551s
archive does not contain 'boot.sig'
Sending 'boot_a' (98304 KB)                        OKAY [  3.502s]
Writing 'boot_a'                                   OKAY [  0.261s]
archive does not contain 'init_boot.img'
extracting dtbo.img (24 MB) to disk... took 0.136s
archive does not contain 'dtbo.sig'
Sending 'dtbo' (24576 KB)                          OKAY [  0.855s]
Writing 'dtbo'                                     OKAY [  0.043s]
archive does not contain 'dt.img'
archive does not contain 'pvmfw.img'
archive does not contain 'recovery.img'
extracting vbmeta.img (0 MB) to disk... took 0.000s
archive does not contain 'vbmeta.sig'
Sending 'vbmeta' (8 KB)                            OKAY [  0.001s]
Writing 'vbmeta'                                   OKAY [  0.001s]
extracting vbmeta_system.img (0 MB) to disk... took 0.000s
archive does not contain 'vbmeta_system.sig'
Sending 'vbmeta_system' (4 KB)                     OKAY [  0.001s]
Writing 'vbmeta_system'                            OKAY [  0.001s]
archive does not contain 'vbmeta_vendor.img'
extracting vendor_boot.img (96 MB) to disk... took 0.398s
archive does not contain 'vendor_boot.sig'
Sending 'vendor_boot' (98304 KB)                   OKAY [  3.522s]
Writing 'vendor_boot'                              OKAY [  0.399s]
archive does not contain 'vendor_kernel_boot.img'
extracting super_empty.img (0 MB) to disk... took 0.000s
Rebooting into fastboot                            OKAY [  0.002s]
< waiting for 849b0d41 >
Sending 'super' (4 KB)                             OKAY [  0.001s]
Updating super partition                           OKAY [  0.016s]
Resizing 'odm_a'                                   OKAY [  0.004s]
Resizing 'product_a'                               OKAY [  0.004s]
Resizing 'system_a'                                OKAY [  0.004s]
Resizing 'system_ext_a'                            OKAY [  0.004s]
Resizing 'system_b'                                OKAY [  0.004s]
Resizing 'vendor_a'                                OKAY [  0.004s]
Resizing 'vendor_b'                                OKAY [  0.004s]
archive does not contain 'boot_other.img'
extracting odm.img (1 MB) to disk... took 0.023s
archive does not contain 'odm.sig'
Resizing 'odm_a'                                   OKAY [  0.004s]
Sending 'odm_a' (1436 KB)                          OKAY [  0.047s]
Writing 'odm_a'                                    OKAY [  0.078s]
archive does not contain 'odm_dlkm.img'
extracting product.img (1404 MB) to disk... took 7.757s
archive does not contain 'product.sig'
Resizing 'product_a'                               OKAY [  0.005s]
Sending sparse 'product_a' 1/6 (261384 KB)         OKAY [  9.669s]
Writing 'product_a'                                OKAY [  0.816s]
Sending sparse 'product_a' 2/6 (262096 KB)         OKAY [  9.677s]
Writing 'product_a'                                OKAY [  0.576s]
Sending sparse 'product_a' 3/6 (262040 KB)         OKAY [  9.908s]
Writing 'product_a'                                OKAY [  0.587s]
Sending sparse 'product_a' 4/6 (261411 KB)         OKAY [  9.789s]
Writing 'product_a'                                OKAY [  0.719s]
Sending sparse 'product_a' 5/6 (261515 KB)         OKAY [  9.622s]
Writing 'product_a'                                OKAY [  0.746s]
Sending sparse 'product_a' 6/6 (122584 KB)         OKAY [  4.156s]
Writing 'product_a'                                OKAY [  0.388s]
extracting system.img (953 MB) to disk... took 5.955s
archive does not contain 'system.sig'
Resizing 'system_a'                                OKAY [  0.005s]
Sending sparse 'system_a' 1/4 (262088 KB)          OKAY [  9.862s]
Writing 'system_a'                                 OKAY [  0.576s]
Sending sparse 'system_a' 2/4 (262052 KB)          OKAY [  9.688s]
Writing 'system_a'                                 OKAY [  0.578s]
Sending sparse 'system_a' 3/4 (261976 KB)          OKAY [ 10.027s]
Writing 'system_a'                                 OKAY [  0.601s]
Sending sparse 'system_a' 4/4 (186680 KB)          OKAY [  7.027s]
Writing 'system_a'                                 OKAY [  0.440s]
archive does not contain 'system_dlkm.img'
extracting system_ext.img (383 MB) to disk... took 2.599s
archive does not contain 'system_ext.sig'
Resizing 'system_ext_a'                            OKAY [  0.005s]
Sending sparse 'system_ext_a' 1/2 (260402 KB)      OKAY [ 10.010s]
Writing 'system_ext_a'                             OKAY [  0.967s]
Sending sparse 'system_ext_a' 2/2 (129316 KB)      OKAY [  4.887s]
Writing 'system_ext_a'                             OKAY [  0.369s]
archive does not contain 'system_other.img'
extracting vendor.img (899 MB) to disk... took 5.471s
archive does not contain 'vendor.sig'
Resizing 'vendor_a'                                OKAY [  0.005s]
Sending sparse 'vendor_a' 1/4 (262032 KB)          OKAY [  9.813s]
Writing 'vendor_a'                                 OKAY [  0.591s]
Sending sparse 'vendor_a' 2/4 (262116 KB)          OKAY [  9.954s]
Writing 'vendor_a'                                 OKAY [  0.550s]
Sending sparse 'vendor_a' 3/4 (262140 KB)          OKAY [ 10.106s]
Writing 'vendor_a'                                 OKAY [  0.582s]
Sending sparse 'vendor_a' 4/4 (130796 KB)          OKAY [  4.986s]
Writing 'vendor_a'                                 OKAY [  0.326s]
archive does not contain 'vendor_dlkm.img'
archive does not contain 'vendor_other.img'
Erasing 'userdata'                                 OKAY [  0.087s]
Erase successful, but not automatically formatting.
File system type raw not supported.
Erasing 'metadata'                                 OKAY [  0.005s]
Erase successful, but not automatically formatting.
File system type raw not supported.
Finished. Total time: 200.340s
Rebooting into bootloader                          OKAY [  0.001s]
Finished. Total time: 0.051s
Locking FP5 84xxxxx bootloader...
6. Please use the volume and power keys on the device to lock the bootloader
C'est presque fini !! On est de nouveau sur cet écran :
il est nécessaire de nouveau le bouton Volume Bas et Power pour atteindre les menus permettant de verrouiller le Bootloader.
Je n'ai malheureusement pas les captures d'écran mais faite l'inverse des étapes, il suffit simplement de faire les étapes fait précedemment. Voici ci-dessous l'écran de toute à l'heure.
Utilisez le bouton VOLUME BAS pour atteindre l'option "DEVICE STATE - unlocked". Puis appuyez sur la touche POWER pour entrer dans un nouveau menu.
À cette étape, vous devez avoir cet écran ici :
Utilisez le bouton volume bas pour descendre sur l'option "LOCK THE BOOTLOADER" et appuyer sur le bouton Power pour appliquer.
Maintenant vous pouvez redémarrer le téléphone. Et voilà ! Le Fairphone 5 est désormais configuré avec CalyxOS.
Vous devriez tombé sur ce message d'avertissement stipulant que le téléphone démarre sur système d'exploitation différent :
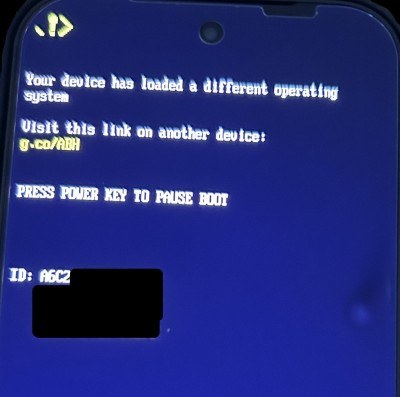
Donc appuyez sur le bouton POWER de nouveau. Puis CalyxOS se lance :

Enfin, les écrans sur la configuration de CalyxOS, comme sur tout Android sur présente à vous :
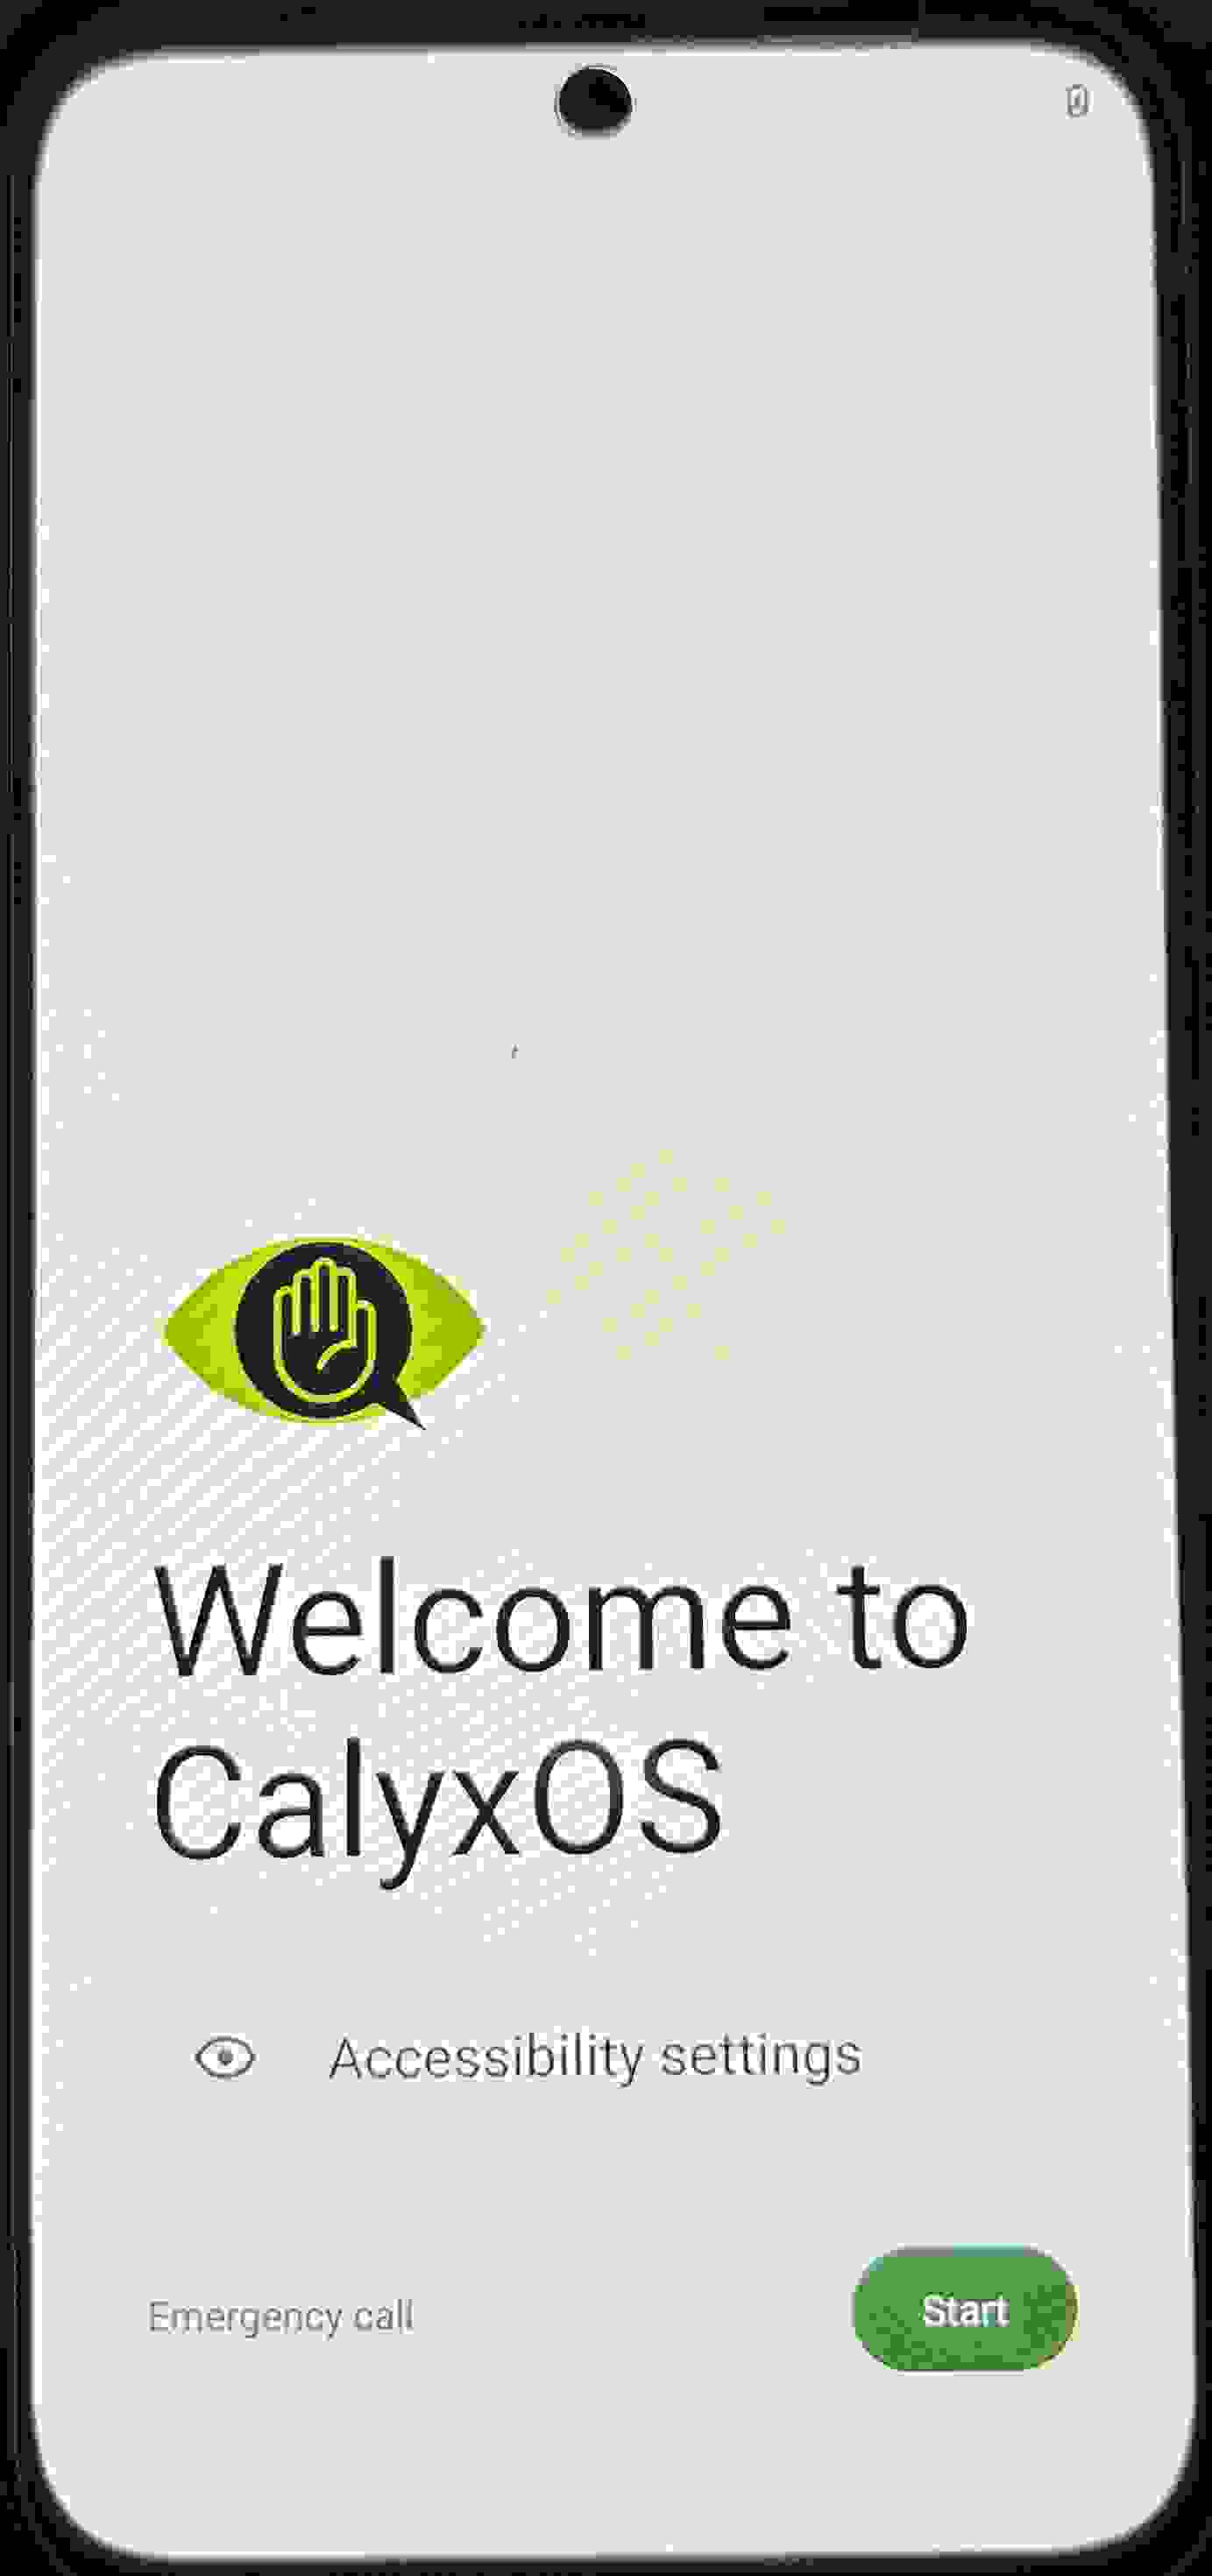
Configuration très rapide de microG :

Et enfin, CalyxOS est prêt à l'emploie !
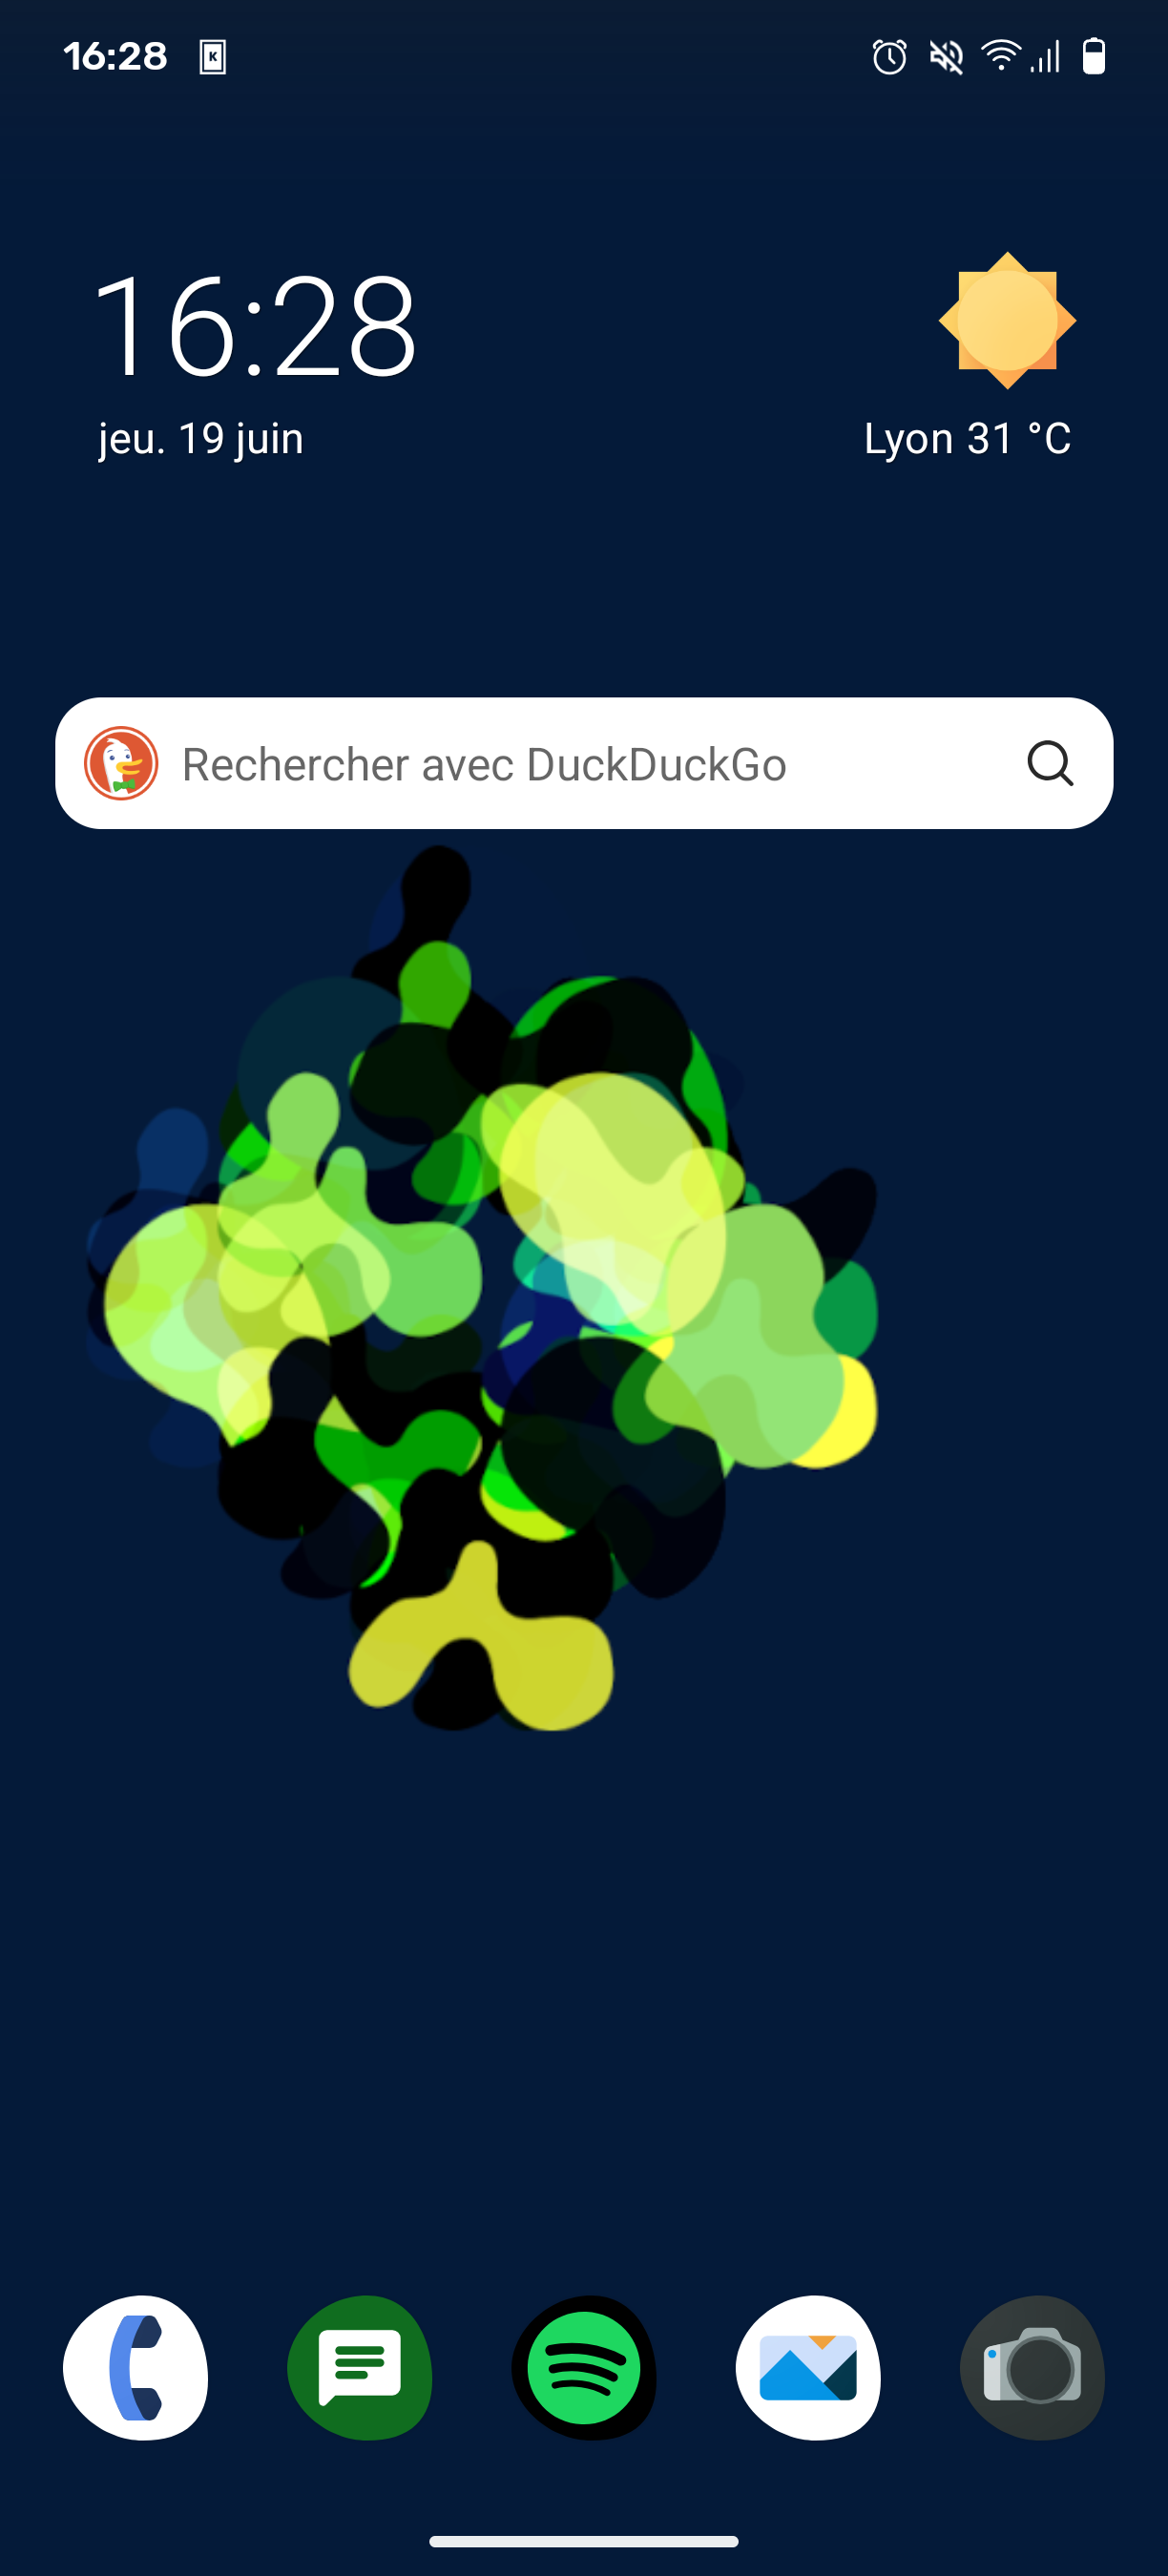
¶ Conclusion
J'utilise aujoud'hui tous les jours CalyxOS comme c'est mon téléphone principal, à part quelques bugs mineurs (application qui faut parfois relancer mais cela arrive très rarement), CalyxOS est une magnifique système d'exploitation, auquel je sens bel et bien une meilleure confiance en mon téléphone. Bravo à l'équipe CalyxOS !